Investigation Report: Malicious Activity Analysis
ROOM
Scenario
Eric Fischer, from the Purchasing Department at Brad Duncan, received an email from a known contact with a Word document attachment. Upon opening the document, he accidentally clicked on “Enable Content.” Soon after, the SOC Department received an alert from the endpoint agent, indicating that Eric’s workstation was making suspicious outbound connections. A PCAP (Packet Capture) file was retrieved from the network sensor and handed to the security team for analysis.
This report details the analysis of the PCAP file, focusing on uncovering any malicious activities associated with the incident.
Credit
- The PCAP file was captured and shared by Brad Duncan and is credited for providing valuable insight to the InfoSec community.
Note:
- Do not directly interact with any domains and IP addresses in this challenge.
Objective
- Investigate the packet capture and identify any malicious activities, specifically focusing on suspicious connections made by Eric’s workstation.
Answering the Questions
Question: What was the date and time for the first HTTP connection to the malicious IP? (Answer format: yyyy-mm-dd hh:mm:ss)
To answer this question, we can filter the traffic to display only HTTP requests and identify the first one. However, by default, Wireshark uses a time format that might not be easily readable. To align with the specified format in the challenge, we need to adjust the time column to match the required format.
Step 1: Change the Time Format
-
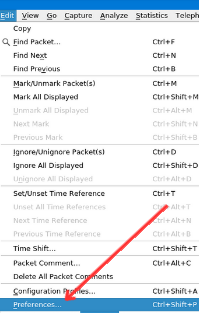
Go to the View tab in Wireshark.
-
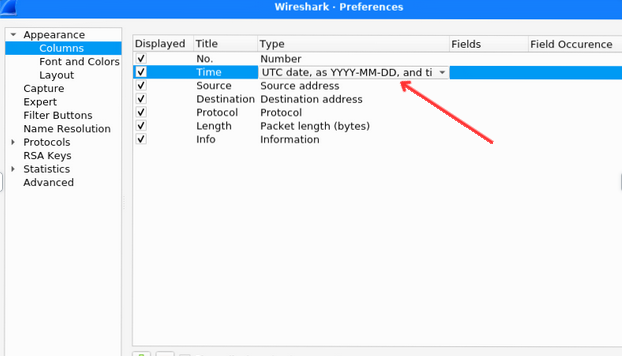
Click on Reference, then select Columns.
-
Change the Time format to match the format requested in the challenge (the TryHackMe time format).
-
Click OK to save the changes.
Step 2: Filter HTTP Traffic
Once the time format has been updated, filter the traffic to show only HTTP requests. You can do this by entering http in the search bar.

Answer:
The date and time for the first HTTP connection to the malicious IP was:
2021-09-24 16:44:38
Question: What is the name of the zip file that was downloaded?
As shown in the image above, we have already found the relevant information. However, to streamline the process and make the search more efficient, we can use an advanced filter to search for HTTP requests containing .zip files. To quickly identify the .zip file, apply the following filter: http.request.url contains ".zip"

This filter will narrow down the results to only those HTTP requests whose URLs contain .zip, making it easier to pinpoint the file in question.While there are various methods to extract this information, using this search filter provides the quickest and most efficient approach.
Answer:
The date and time for the first HTTP connection to the malicious IP was:
documents.zip
Question: Identifying the Domain Hosting the Malicious ZIP File
This question asks us to identify the domain hosting the document.zip file. While we already know the IP address, the task is to resolve this IP to its corresponding domain name.
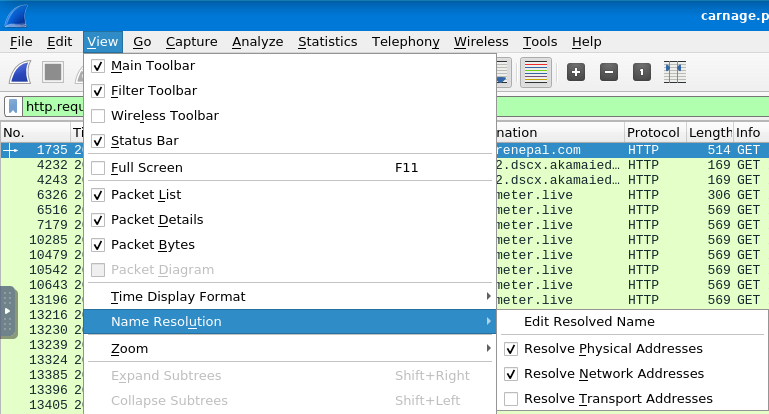
Thankfully, Wireshark provides a feature called Resolve Network Address, which automatically resolves IP addresses to their associated domain names.
Step 1: Enabling Name Resolution in Wireshark
To resolve the IP address to a domain name, follow these steps:
- Navigate to the View tab in Wireshark.
- Select Name Resolution from the dropdown menu.
- Check the option Resolve Network Addresses.
After doing so, Wireshark will attempt to resolve the IP addresses in the capture to their corresponding domain names.
Step 2: View the Resolved Domain Name
Once the network addresses are resolved, you will see the IP address translated into its domain name in the packet details.

Answer:
The domain hosting the malicious ZIP file is:
attirenepal.com
Question: Without Downloading the File, What is the Name of the File in the ZIP File?
To answer this question without directly downloading the file, we can export the file from the packet capture and then examine its contents.
Step 1: Exporting the File from Wireshark
- Open Wireshark and go to the File menu.
- Select Export Objects from the dropdown menu.
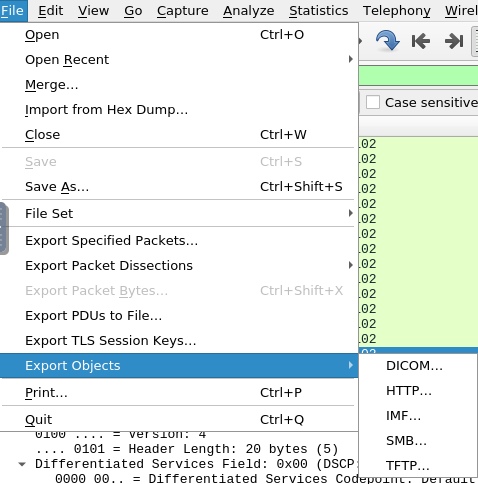
- In the dialog that appears, select the HTTP protocol (since the file was transferred over HTTP).
- Locate the
document.zipfile in the list of HTTP objects.
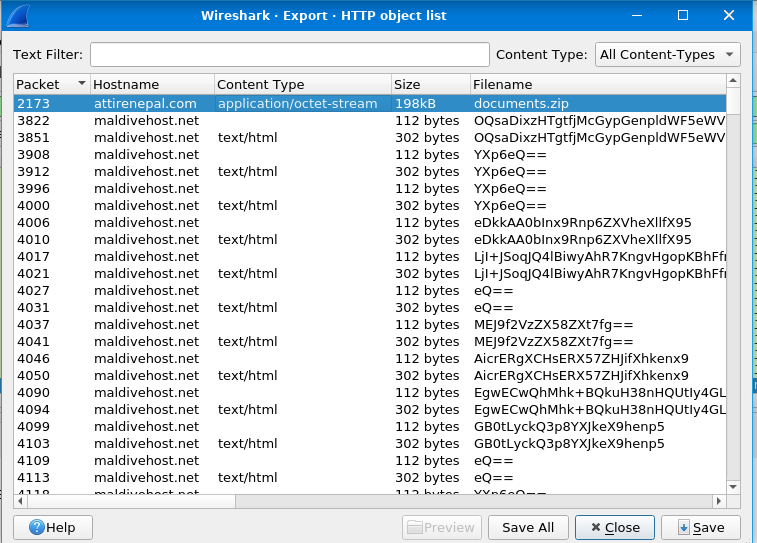
Step 2: Saving and Extracting the ZIP File
- Click on Save to store the file in a folder of your choice.
- Once saved, navigate to the folder where you saved the ZIP file and extract its contents.
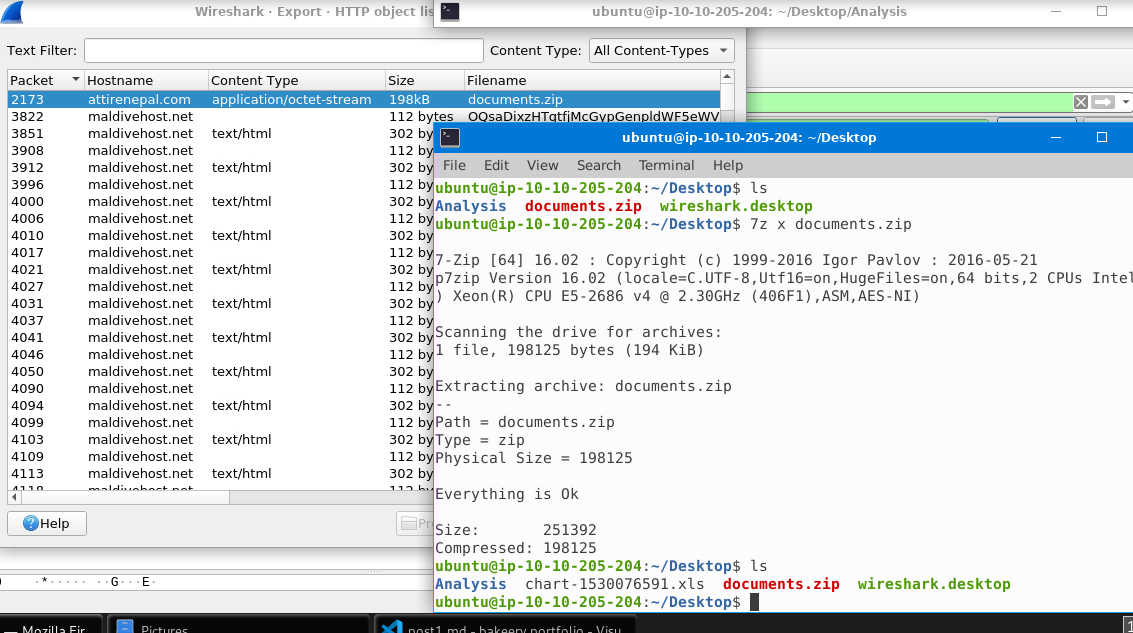
After extracting the ZIP file, you can view its contents.
Answer:
The content of the ZIP file is:
chart-1530076591.xls
Question: What is the Name of the Webserver of the Malicious IP from Which the ZIP File Was Downloaded?
To answer this question, we need to inspect the HTTP stream of the document.zip traffic. The webserver information can typically be found in the HTTP headers.
Step 1: Viewing the HTTP Stream
- Right-click on the relevant HTTP traffic related to the
document.zipdownload. - From the context menu, select Follow and then choose HTTP Stream.
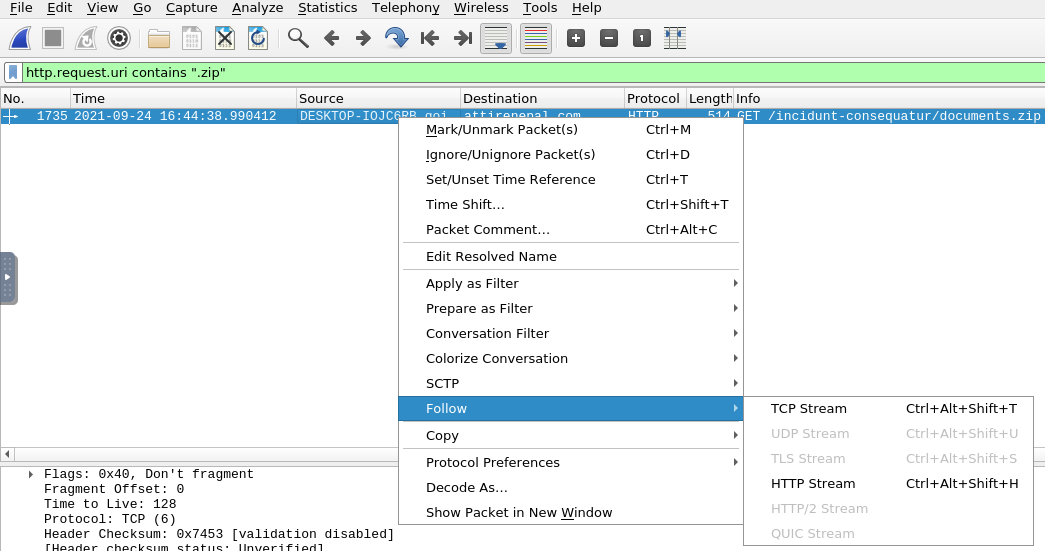
This will open a window displaying the entire HTTP conversation for the document.zip request and response.
Step 2: Identifying the Webserver
In the HTTP stream, look for the Server header. This header will typically contain the name and version of the webserver hosting the file.

Answer:
The webserver name is:
LiteSpeed
Question. What is the version of the webserver from the previous question?
From the above image we can see the webserver version.
Answer:
The webserver version is:
PHP/7.2.34
Question. Malicious files were downloaded to the victim host from multiple domains. What were the three domains involved with this activity?
I had to use the hint, which says, “Check HTTPS traffic. Narrow down the timeframe from 16:45:11 to 16:45:30.” That’s a very good hint, isn’t it? Then, I crafted this query: tcp.port == 443 && frame.time >= "2021-09-24 16:45:11" && frame.time <= "2021-09-24 16:45:30" && tls.handshake.extensions_server_name

Wireshark Display Filter Breakdown
This Wireshark display filter is used to show specific types of network traffic. Let’s break it down:
tcp.port == 443:- This part filters the packets to show only those using TCP port 443. Port 443 is commonly used for HTTPS traffic, which is secure web traffic (for websites you visit with “https://”).
frame.time >= "2021-09-24 16:45:11" && frame.time <= "2021-09-24 16:45:30":- This part focuses on packets that were captured between 16:45:11 and 16:45:30 on September 24, 2021. given in the Hnt
- It’s useful when you want to zoom in on a specific time frame and examine what happened during that exact period.
tls.handshake.extensions_server_name:- This part looks at a specific field in the TLS handshake (the beginning of a secure HTTPS connection).
- The Server Name Indication (SNI) is included in the handshake and tells the server which website domain the client wants to connect to.
- This filter helps you see which website (domain name) the client is trying to reach during the secure connection setup.
Answer:
The three domains involved are:
finejewels.com.au, thietbiagt.com, new.americold.com
Question : Which Certificate Authority Issued the SSL Certificate to the First Domain from the Previous Question?
To answer this question, we need to examine the SSL/TLS certificate information in the HTTP stream.
Step 1: Viewing the HTTP Stream
- Right-click on the relevant HTTP traffic related to the domain in question.
- From the context menu, select Follow and then choose HTTP Stream.
Step 2: Identifying the Certificate Authority
In the HTTP stream, look for the certificate details. The Certificate Authority (CA) is usually listed in the response headers, often under the Issuer field or explicitly stated in the certificate chain.
In this case, the certificate issuer is clearly listed as GoDaddy Secure Certificate Authority.
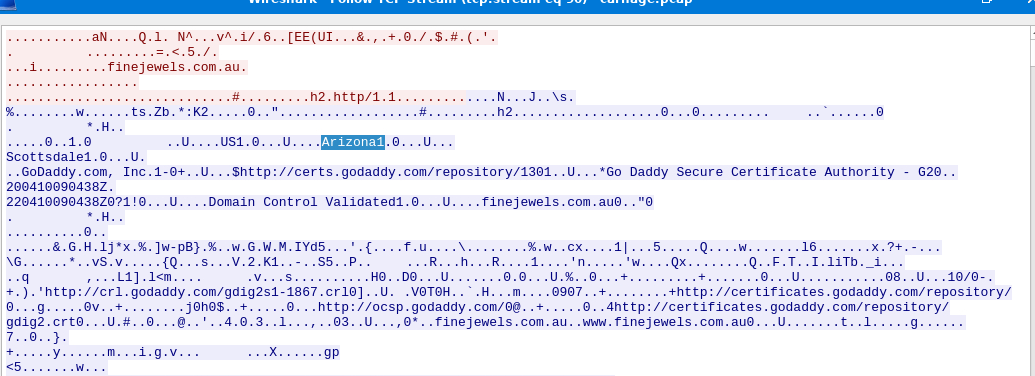
Answer:
The certificate authority that issued the SSL certificate is:
GoDaddy
Question: What are the two IP addresses of the Cobalt Strike servers? Use VirusTotal (the Community tab) to confirm if IPs are identified as Cobalt Strike C2 servers. (answer format: enter the IP addresses in sequential order)
To answer this question, we need to identify the malicious IP addresses that contacted our server and confirm whether they are associated with Cobalt Strike servers using VirusTotal.
Step 1: Identify Malicious IPs
First, we will filter the traffic to identify the malicious IP addresses that have made connections to our server. To do this, use Wireshark’s filter feature.
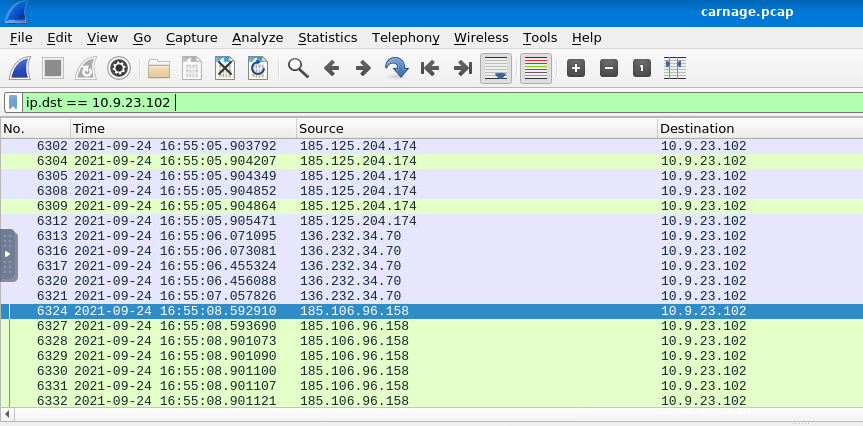
The IP addresses listed in the screenshot above are suspected to be malicious. We will now look up each IP on VirusTotal to confirm whether they are Cobalt Strike command-and-control (C2) servers.
Step 2: Look Up IPs on VirusTotal
-
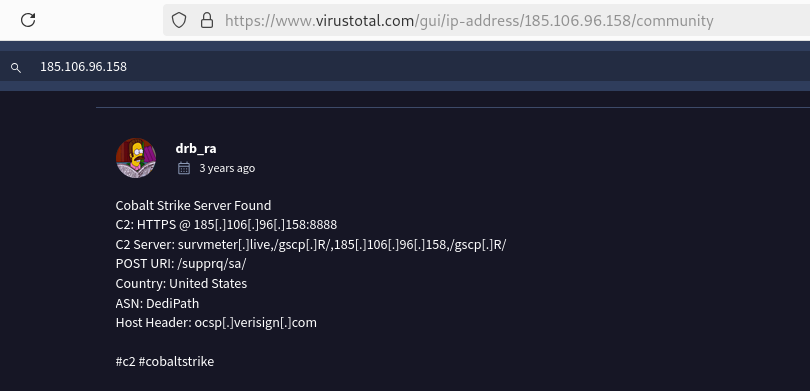
IP 1: 185.106.96.158
When we look up this IP address on VirusTotal, we can see in the community section that this IP is identified as a Cobalt Strike server.
-
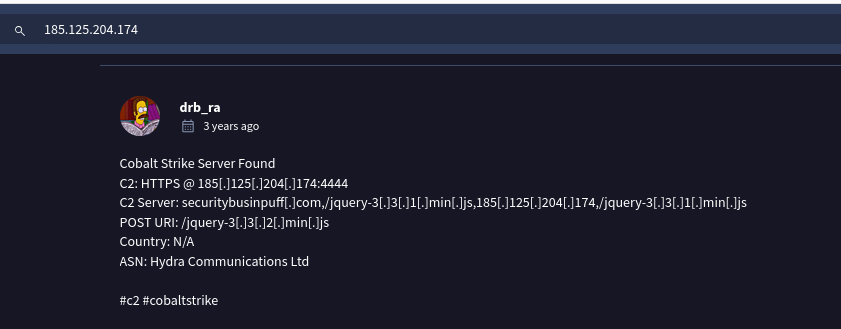
IP 2: 185.125.204.174
Similarly, this IP is also flagged on VirusTotal as a Cobalt Strike server.
Answer:
The two Cobalt Strike server IP addresses are:
185.106.96.158, 185.125.204.174
Question: What is the Host header for the first Cobalt Strike IP address from the previous question?
Frome the above first picture we can see the Host Header
Answer:
The First Cobalt Strike server Header is:
ocsp.verisign.com
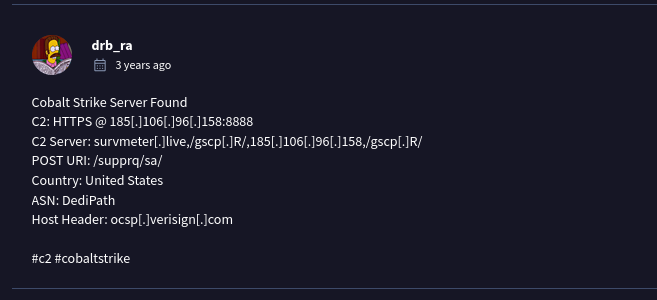
Question: What is the domain name for the first IP address of the Cobalt Strike server? You may use VirusTotal to confirm if it’s the Cobalt Strike server (check the Community tab).
In the First Image we can see the domain name as well
Answer:
The First Cobalt Strike server domain name is:
survmeter.live
Question: What is the domain name of the second Cobalt Strike server IP? You may use VirusTotal to confirm if it’s the Cobalt Strike server (check the Community tab).

Answer:
The second Cobalt Strike server domain name is:
securitybusinpuff.com
What is the domain name of the post-infection traffic?
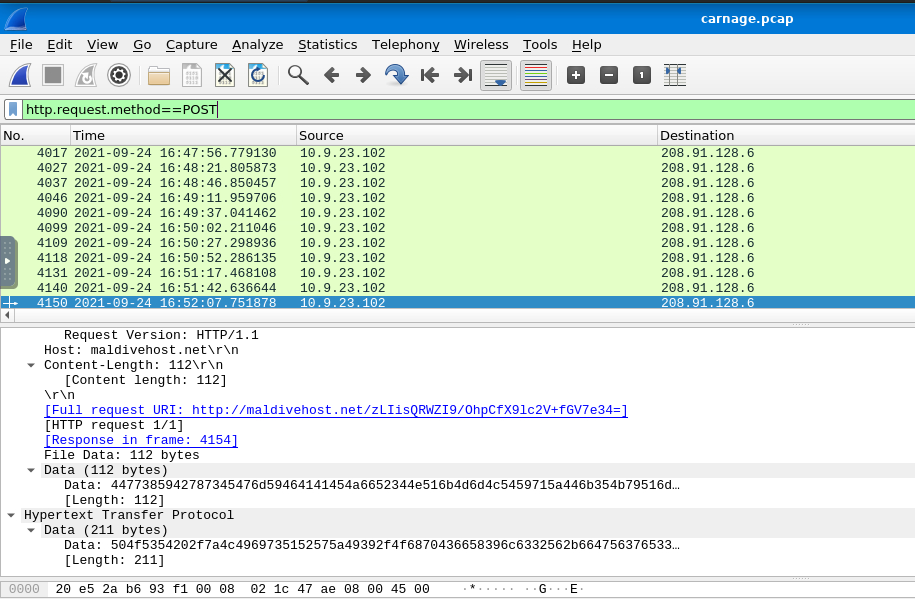
The Hint says: Filter Post HTTP traffic. Ahha Interesting. i filtered the post request as http.request.method=='POST'and there we go…
Answer:
The post traffic domain name is:
maldivehost.net
Question: What are the first eleven characters that the victim host sends out to the malicious domain involved in the post-infection traffic?
Ahha, Bug bounty knowledge helped me here. Just right-click on the traffic and go to HTTP stream to see it clearly. Although it can be seen from the above picture, for better visibility, I recommend checking the HTTP stream.

Answer:
The first eleven characters are:
zLIisQRWZI9
Question: What was the length for the first packet sent out to the C2 server?
We just simple filter the POST request as http.request.method==POST and look for the first request:

Answer:
The Length of the first packet is:
281
Question: What was the Server header for the malicious domain from the previous question?
From the image above, we can clearly see the server header.

Answer:
The Server header is:
Apache/2.4.49 (cPanel) OpenSSL/1.1.1l mod_bwlimited/1.4
Question: The malware used an API to check for the IP address of the victim’s machine. What was the date and time when the DNS query for the IP check domain occurred? (answer format: yyyy-mm-dd hh:mm:ss UTC)
To answer this, we can use the “Find” filter with a regex search. Simply search for any domain containing “api.”

Answer:
The time is:
2021-09-24 17:00:04
Question: What was the domain in the DNS query from the previous question?
From the above image
Answer:
The domain is:
api.ipify.org
Question: Looks like there was some malicious spam (malspam) activity going on. What was the first MAIL FROM address observed in the traffic?
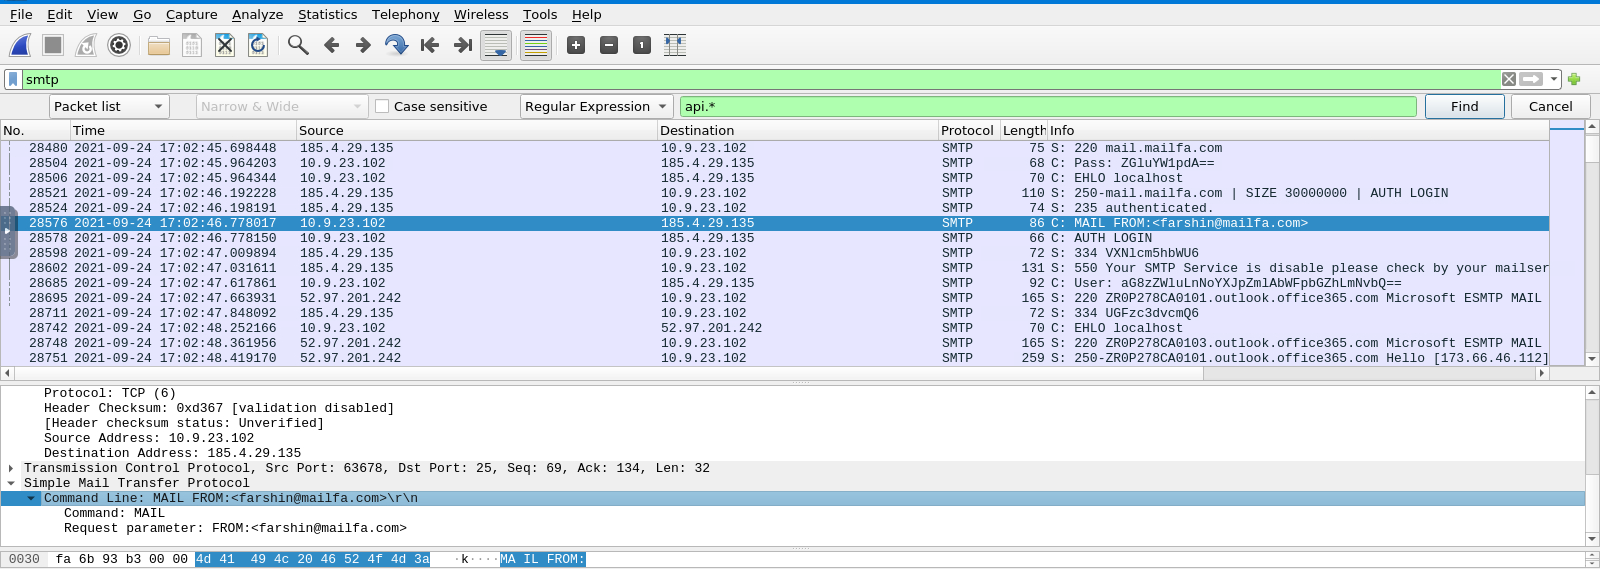
To find the first “MAIL FROM” address, we need to filter for SMTP (Simple Mail Transfer Protocol), which is used for transferring emails. I applied a simple filter for the protocol and then examined the traffic.
Answer:
The first mail that was sent is:
api.ipify.org
Question: How many packets were observed for the SMTP traffic?
From the above picture the number of packets can be easily observed in Wireshark by looking at the packet count displayed at the bottom of the window. In the “Packet List” pane, you will find the total number of packets captured in the current session.
Answer:
The number of packets are: 1439
Summary
Congratulations on completing the challenge!
In this exercise, we explored various techniques for analyzing network traffic using Wireshark to uncover malicious activities. From filtering traffic based on protocols like HTTP and SMTP to resolving IP addresses and inspecting DNS queries, we learned how to identify suspicious patterns indicative of malware infections.
Happy learning and stay secure!